Triple Monitor Stand

23 02 2010

In the great tradition of the home handyman I decided to have a crack at making my own monitor stand….Armed with local hardware supplies and one old monitor stand I got underway.

I thought for a short while that I was going to pull it off, but after getting to the point of screwing on the monitor, it was clear that I had FAILED.

The side monitors were drooping badly and were touching the desk LOL….so I was left with a useless weird looking sculpture. Hang on maybe I should investigate how much to get some one to weld me up something exactly like this….so off I went with my “prototype” and went door knocking to a few local shops. One place wanted $180 and another over $200, I thought stuff that and was going to give in and buy one of those monitor stands from some one on the net. When I went past one last shop so I dived in and after a short chat deal was done for $50.

I went back home and did a double check on measurements, and took the prototype back to be built.

I must say I was a bit concerned how it was going to turn out as I gave a fairly open brief but I knew it couldn’t go to wrong as I had a full scale model as reference for them. As it turned out it was better than expected.

Now as I connecting up the monitors together I stuffed up with my accurate measuring…by a few cm….I would have been ok if I didn’t go and re-measure and just left them as it was originally LOL. Anyways I managed to work around that and fit the monitor on with a little diy…ugly but good thing is you dont get to see it from the front đŸ™‚ I am going to fancy up the base with some MDF when ever I get around to it but for the mean time it does what it needs to do and that is hold 3 screens and move from desk to sim and back again.

I am planing to make a more intricate version now I have this one up and running…which means I can use it on race nights, while I design and get the fancy one built, and considering the cost of some of the triple monitors stands on the market I may even make a few and see if anyone is interested in buying them. I doubt they will cost $50 bucks but they will be considerably less than 99.99% of the other ones on the market.

The next one will have hinges, a nice base, QR height adjustable stand, and cable guides…etc,  more on that as it happens.

So here it is, not anything too brilliant  but it is perfect for me at the moment.
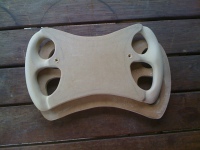
My “Prototype”

The Beast!


Hi all…

5 02 2010

Here is just some update pics, mainly on screens.

I got 3 x 19′ acer for $110.00 so While I wanted 3 screens the same size the price was too good.

I’ll fill in some blanks on work soon.


Happy New Year

31 12 2009

Happy new years to all and I hope your Christmas was enjoyable!

I have done a little bit of work on my little project so here are the latest pics I have of the work taking place.
In these pics I have started the removable headrest protection area, while most will know what this section is, for the others…its a section that sits around the drivers head and continues down to almost in line with the wheel. This section can be  removed by driver to aid in getting in and out of the car.

It is still possible to get in and out with out removing this section, but it is rather a tight fit and requires angling the shoulder to do it. The width is regulated by the FIA but as a practical size when it’s installed it makes the cockpit opening about the width of your hips.

Not finished in those pics but you can see even though it looks rather crude it’s starting to take form.

I also got a chance to drag the rig out side to add and shape the largest top piece of the nose area.

So there you have it… đŸ™‚

More pics soon as I want to try and get it all assembled in January so I can get it painted….hmmmm now to chose a colour. I swore it wasn’t going to be red but now one Schumi has left maybe I can once again support Ferrari…!!! Don’t know now…hmmmmm. Maybe I’ll make my own livery?!?!

While I consider MS to be one of the best drivers ever, he isn’t THE BEST imho… 

Ayrton Senna holds that crown and will for some time.

In saying that I am pumped that Schumi has decided to make a come back..The 2010 F1 season is looking like it will be an absolute cracker! Can’t wait.


More buttons

13 12 2009

A few buttons inside the cockpit.

It’s good now I dont have to use the keyboard as all the buttons I need are either on the wheel or with in easy reach. All the wiring etc is hidden away and out of harms reach. Happy to have that chore out of the way now…

So many wires….It’s not a hard thing to do but it is time consuming.

If there is a coolish day soon I will drag it out side and install the top of the nose and route it, but it’s been so HOT lately. Too hot to move……

One year I really would love to see snow rather than sweating 20 hours a day. đŸ™‚


Update

9 12 2009

Just a few pics of wheel and me and my floral boardies inside the cockpit…:)

I managed to paint the wheel and rebuild it using the hacked usb number pad I posted about last time. Amazing amount of wires inside the wheel, but more amazing (well to me ) is the the lack of wires coming out…got to love usb devices!

Not finished with wheel just yet, got to make up some decals for buttons, get better knobs, and make provision to have wires travel up the steering column, and connect via QR din style of connection. But that sort of stuff doesn’t need to happen right away. Next plan while I have the soldering bug is to add internal buttons for functions like seat adjustment,  starter, exit etc things I wouldn’t use mid race. These will go nicely on dash bulkhead and on the upper armrest areas.

Enough talk here’s some pics.


Progress

2 12 2009

Hi all just small update of work done.

Pulled wheel apart to finish it….

Spent my time sanding and priming the front half of the wheel and then gave it a few coast of gloss black.

I think it come up pretty good, not to worried about the handles as I will glue some leather or rubber on them. Not bad for $3 can of spray paint đŸ™‚

___________________

I also had to add the covering for cockpit infill or armrest area as it was majorly painful to use the sim with out some once I put it in, my elbows would graze the edges and scrap…now it great.

I have plenty of room to turn wheel with out fouling against the area but I can also use it to rest or brace the elbows/arms on straights and long corners.

Amazing how pic quality changes from outside light to inside light… đŸ˜¦

_______________________

I have also being a tight ass decided to hack a usb numerical pad to use more button options…Highly recommend do this mod if you have the time to put aside to figure it all out.

I was fairly crapping myself even thinking of dong this but after I realized I would only be screwing up a $5 keyboard I felt a little more at ease. Also to say  my soldering skill aren’t that good would be putting it mildly but even this knob managed to do it.

Then I semi traced all the lines to keys before hand so I knew what most of the keystrokes would do…but  then I had to methodically go thru and work it all out just to make sure.

So now I have a 20 button usb encoder to use…and it will be great as it will cut down the amount of wires that is slowly building up.

This is my highly sientific method to mapout keystrokes…..

And just to show the behind the scene mess I have created….LOL

ummm wife = not happy!

Dont worry dear I’ll clean it up….I need to I only have a 20cm by 20cm work space to move the mouse….

Oh nearly forgot I bought some of this stuff for the wheel…..

And wish I didn’t bother….it looks a treat, but this stuff is useless, it won’t stick properly it doesn’t mold at all. It would be excellent if you wanted to cover a book or something flat and that’s about it. I spent ages preparing surface and then going slowly but a total wast of money and waste of my time.  Grrrrrrrrrrr


Cockpit detail

27 11 2009

I have been doing some  interia cockpit work, again pics are rubbish quality (sorry) but once I get a chance I will drag the thing outside and take some better pics with some good lighting.

It’s all a but rough looking as I haven’t done any cleaning up or sanding work yet. I will add a cover over the ‘arm rest area over the next day or so…then comes my favorite job (not) adding filler and sanding….

__________________

Wheel work

I finally received my rotary encoders so I added them to the wheel, they haven’t been hooked up yet though.

I am not sure if I will keep those dials/knobs and colour the top cap with different colours or go for the ones I originally wanted. The ones on now came with the encoders.

Good price too…10 units for $13..if they fail…who cares :), it also means I have a few that I can setup inside the cockpit and be able to use them for seat adjustment,  mirror adjustment…or something like that.

Clutch is next on the to do list, and I have  some carbon fiber stick on stuff waiting to be delivered…again still waiting on this..I wish people would just do as they say some times.

__________________

Engine cover/air intake

Again these pics were taken just after a trial fitting and look rough as guts as I haven’t finished it off yet.

What I have done from prior pictures is re-shape the back half of the unit. It never really looked right to me, so I cut and carved and came up with a shape I will be happy with once finished. You can see I have a little hollow section near the rear which needs a slight build up to finish the shape off correctly,  I was going to have to add fill anyways so it’s not an issue.

I really like the shape now.

More soon….


More pics

16 11 2009

I was asked a question about the buttons so I went and took a few pics to detail sizes etc, also took a pic of the inside paneling of main rig too.

I am sorry for pic quality but blame apple for that….


Wheel progress

16 11 2009

No major updates been a bit slow…

I did manage to add the inside paneling to rig, no pics of that yet though, and I will be doing a bit more work on rig this week. So I’ll update that when done.

Onto the wheel…

My buttons finally showed up so that spurred me into action, I routed out the inside of the rear cover, and marked out and drilled the holes for buttons. I also did a bit more shaping work on the front. I like the overall look of front now so I will finish tidying that up and then leave it till the carbon fiber film goes on. Oh I also am waiting on some rotary switches to show up…I was told yer we have them in stock only to order them to find out sorry they are out of stock will post them as soon as we have them.

I have also just started investigating how to setup paddles for gears and clutch on the back of the wheel, now armed with some plans I will get that going while waiting for rotary switches.

Anyways not many pics but here is a few just to keep up todate…Should have more action shots later this week.

I haven’t added all the buttons in those pics but when I do I will still be left with a few spare, which works out great as I ca use them to add a small button panel inside the cockpit.

Really happy with buttons, great size and seem to have a nice action too. Not to flimsy but not a million dollar item either.


Wheel update

5 11 2009

Just an update on the  progress…

I haven’t done much on main rig lately but I have been able to do a bit of work on my wheel.

The buttons I ordered haven’t shown up yet…grrrr but atleast this gives me time to do the work need to have a usable wheel. While not a terribly hard job it is something that takes a fair bit of time and patients to do. And then repeat on on the other side to make it look similar if not the same. đŸ™‚

Also I don’t have one of those dremels either which would make life so much easier LOL so most shaping after initial cutting has been done by hand.

Enough talk here is some pics